

Some chili recipes just slap different. This is one of them. Matt Pittman of Meat Church BBQ has been quietly dominating cook-offs with this Texas chili recipe for years, and once you understand what goes into it, you’ll see exactly why. We’re talking four pounds of meat, a smoked chuck roast, fire-roasted tomatoes, and a low-and-slow cook that turns everything into something genuinely special.
- What You Need to Make Meat Church Chili
- Ground Beef (2 lbs, Coarse Chili Grind)
- Hot Breakfast Sausage (1 lb)
- Smoked Chuck Roast (Just Over 2 lbs)
- Red Onions (3 whole)
- Head of Garlic (1 whole)
- Chipotle Peppers in Adobo Sauce (1 can, Full Can)
- Meat Church Chili Seasoning (5 tablespoons)
- Canned Tomatoes (84 oz total)
- Bock Beer (1 bottle)
- How to Make Meat Church Chili (Step by Step)
- Step 1: Smoke or Sear the Chuck Roast
- Step 2: Cook Down the Aromatics
- Step 3: Brown the Ground Meat and Sausage
- Step 4: Cut Up the Chuck Roast
- Step 5: Combine Everything in a Dutch Oven
- Step 6: Add the Tomatoes and Beer
- Step 7: Simmer Low and Long
- Step 8: Taste, Adjust, and Serve
- Pro Tips to Make the Perfect Meat Church Chili
- Serving Ideas
- Frequently Asked Questions
- Can I make this chili without a smoker?
- Do I have to use Meat Church Chili Seasoning?
- Can I add beans to this recipe?
- How do I store and reheat leftovers?
- Can I make this ahead of time for a party?
- Wrapping It Up
- meat church chili recipe
“I call it a grand champion recipe because I won my office cookoff back in Corporate America — but we hear from people winning their cul-de-sac contest, sanction contests, work contests.”
Matt said that while explaining why this recipe keeps spreading. What started as a family meal turned into one of the most-referenced chili recipes in the entire BBQ community. That kind of track record doesn’t happen by accident.
This is proper Texas-style chili, which means no beans. Before you close the tab, hear the reasoning out: traditional Texas chili is about letting the meat and the chiles do the heavy lifting without fillers getting in the way. The smoked chuck roast handles the heartiness that beans would normally provide, and honestly? It does a much better job. You can always add beans if that’s your thing, but try it this way first.
What You Need to Make Meat Church Chili
This recipe is built around four pounds of meat and a lineup of bold, smoky ingredients that spend hours getting to know each other in the pot. Quality matters here more than you might expect, so let’s break down every component before you hit the store.
[IMAGE — Timestamp: 2:04–2:26 — What to screenshot: All the raw ingredients laid out on the prep surface including ground beef, breakfast sausage, chuck roast, red onions, garlic, chipotle peppers, and canned tomatoes giving a full overview of what goes into the recipe. — Placement: Ingredients section overview image]
Ground Beef (2 lbs, Coarse Chili Grind)
Ground beef is the backbone of the meat mixture, and the type you pick genuinely matters. Matt recommends a 90/10 lean-to-fat ratio so the chili doesn’t turn into a grease puddle after eight hours on the heat. More importantly, go for the coarse chili grind if your butcher carries it. The larger pieces hold together through the long cook and give every spoonful real texture instead of that mushy, uniform look you get from standard ground beef. If the coarse grind isn’t available, ask your butcher to run a chuck through the grinder once instead of twice. Skip pre-seasoned ground beef entirely because the chili seasoning you add later needs to control the flavor without competing with anything else.
Hot Breakfast Sausage (1 lb)
One pound of hot breakfast sausage joins the ground beef, and this is where a subtle layer of spice gets built into the base. Matt grew up on Odom’s Tennessee Pride, but any quality hot breakfast sausage works fine. The sausage pulls triple duty here: it adds fat, seasoning, and background heat that blends into the chili rather than jumping out at you. If your crowd runs mild, swap it for regular breakfast sausage. IMO, the hot version is worth it because the spice mellows beautifully over the long cook. Just don’t reach for Italian sausage. The fennel flavor will take the whole pot somewhere it was never meant to go.
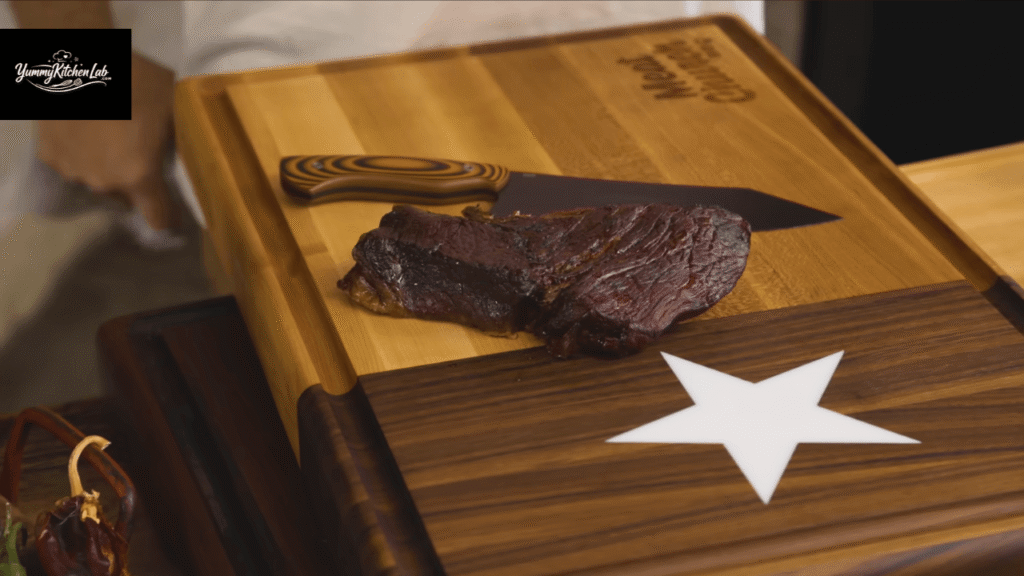
Smoked Chuck Roast (Just Over 2 lbs)
This is the ingredient that makes this recipe genuinely different from every other home chili you’ve had. A chuck roast gets smoked low and slow, broken into large chunks, and added to the pot where it spends another eight hours slowly falling apart. The result is a richness and heartiness that ground meat alone could never deliver. Matt uses chuck roast specifically because it’s cheap and available everywhere. FYI, if smoking isn’t in the cards for you, sear it hard in a cast iron skillet on all sides before cutting it up. You’ll miss some of the smoke flavor, but the texture will still be there.
Red Onions (3 whole)
Three full red onions get diced and cooked down before they ever hit the main pot. Red onions bring a slightly sharper and sweeter flavor than yellow onions, and they hold up better through hours of simmering without disappearing completely into the background. Matt sautés them together with the garlic and chipotle peppers for about ten minutes before everything gets combined. That pre-cook step softens the raw bite and starts layering flavor early. Raw onion dumped straight into a slow-simmering chili never integrates the same way, so don’t skip this.
Head of Garlic (1 whole)
The whole head goes in. Not a clove. Not two cloves. The entire head of garlic, and yes, that is intentional. Over eight hours of low simmering, garlic loses all its sharpness and becomes part of the body of the chili, adding depth without announcing itself. Use fresh garlic rather than the jarred pre-minced stuff. The pre-minced version carries a slightly fermented flavor that gets worse, not better, during a long cook. Dice it fine so it spreads evenly during the sauté step.
Chipotle Peppers in Adobo Sauce (1 can, Full Can)
One full can of chipotle peppers in adobo sauce goes in, and that means the peppers and every drop of the sauce. Chipotle peppers are smoked jalapeños, so they bring both heat and smoke to the party. If you’re making this indoors without a smoker or pellet grill, these peppers become even more critical because they provide the smoky backbone the recipe depends on. Chop the peppers finely before adding them so they incorporate evenly without leaving big chunks. Don’t hold back on the sauce either; it’s full of flavor.
Meat Church Chili Seasoning (5 tablespoons)
Matt adds five tablespoons of his own Meat Church Chili Seasoning to this recipe, and it’s built around a smoky, chile-forward profile that ties everything together without taking over. If you can’t get your hands on Meat Church seasoning, use a quality Texas-style chili seasoning blend. The key thing to look for is dried chiles listed prominently in the ingredients rather than generic “chili powder” as a catch-all. If you’re using a different brand, start with three to four tablespoons, taste, and go from there. Heat levels vary a lot between products.
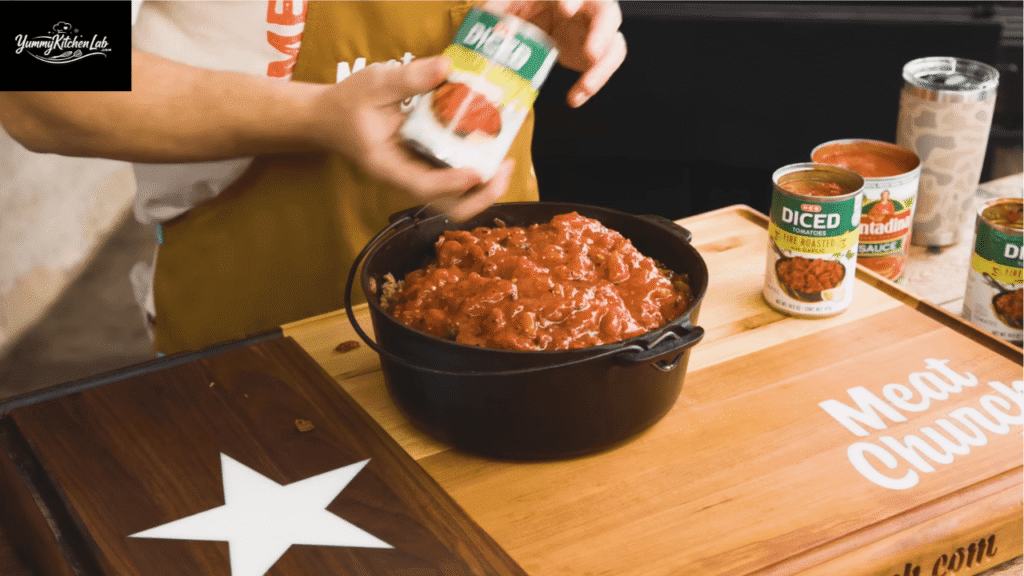
Canned Tomatoes (84 oz total)
The recipe needs 84 ounces of tomato product total. Matt splits this between 56 ounces of diced tomatoes and 28 ounces of crushed tomato sauce. He specifically reaches for fire-roasted diced tomatoes when available because the subtle char adds depth that regular canned tomatoes simply don’t have. Chipotle-flavored canned tomatoes are another solid option if you want to push the smoky notes further. Pour in all the liquid from every can. That juice is part of what the chili simmers in for hours, and it concentrates into something rich and deep over time.
Bock Beer (1 bottle)
A German-style Bock beer goes in near the end of the assembly, and this one comes from the recipe’s German-style chili roots. The malty, slightly bitter character of a Bock rounds out the richness of the meat and softens the acidity of the tomatoes. Matt pours in as much as fits in the Dutch oven and drinks whatever’s left, which honestly sounds like a reasonable system. If you can’t find a Bock, a dark lager or amber ale works well. Stay away from IPAs because the hop bitterness amplifies during a long cook instead of balancing out.
How to Make Meat Church Chili (Step by Step)
Step 1: Smoke or Sear the Chuck Roast
Start with the chuck roast the night before if your schedule allows. Coat it lightly with oil, skip any additional seasoning, and smoke it at 225°F for at least four to five hours. Matt runs a Traeger with hickory pellets for this. The goal is real smoke penetration and the beginning of the breakdown process. If overnight smoking isn’t happening, sear the roast hard in a cast iron skillet for two to three minutes per side over high heat. The crust that forms adds depth, and you’ll still get great texture even without the smoke.
Step 2: Cook Down the Aromatics
Dice the three red onions, mince the full head of garlic, and chop the chipotle peppers from the can. Add everything to a cast iron skillet with a little oil and cook over medium heat for about ten minutes, stirring as you go. You want the onions soft and translucent and the garlic fully mellowed. This is the foundational flavor step, and it deserves the time. Cranking the heat to rush it will burn the garlic and ruin the flavor base before the recipe even gets started.
Step 3: Brown the Ground Meat and Sausage
Cook the two pounds of ground beef and one pound of breakfast sausage together until fully browned. Break the meat apart as it cooks so you keep it loose and textured. You want chunks, not a packed slab. With 90/10 beef and quality sausage, there shouldn’t be much excess fat, but drain a little if things look greasy. Don’t drain it all the way though because some of that fat carries flavor you’ll want in the final pot.
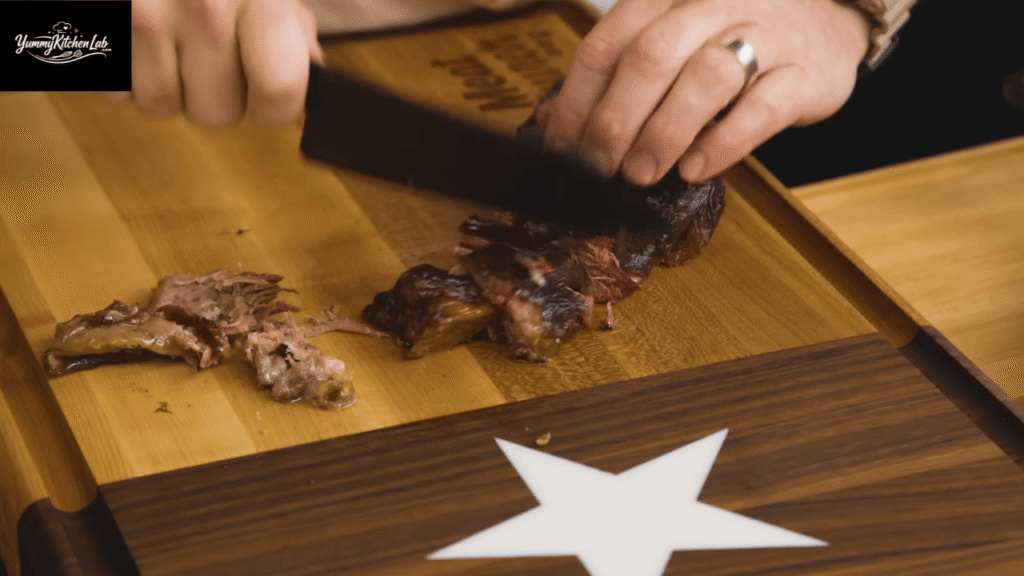
Step 4: Cut Up the Chuck Roast
Take the smoked chuck roast and break it into large chunks, roughly one to two inches each. If it was smoked long enough, it will already want to pull apart on its own. That’s a good sign. You want the pieces substantial enough to survive another eight hours of simmering while still breaking down into the chili gradually. This is exactly what replaces beans in the heartiness department, and it does it better.
Step 5: Combine Everything in a Dutch Oven
Grab the largest Dutch oven you own. Matt admits on camera that he should have used a bigger one, so learn from that. Add all the browned meat, the cooked aromatics, and the chuck roast chunks. Stir it together. Add the five tablespoons of chili seasoning and mix it through the meat before the tomatoes go in. Getting the seasoning into the meat first helps it distribute evenly rather than sitting on top of a liquid pool.

Step 6: Add the Tomatoes and Beer
Pour in all 84 ounces of tomato product, starting with the diced tomatoes and their juice, then the crushed tomato sauce. Add the Bock beer last. Stir everything together as well as you can given how full the pot will be. It is going to look extremely full at this point, and that’s completely normal. The chili cooks down significantly over the next several hours, so trust the process.
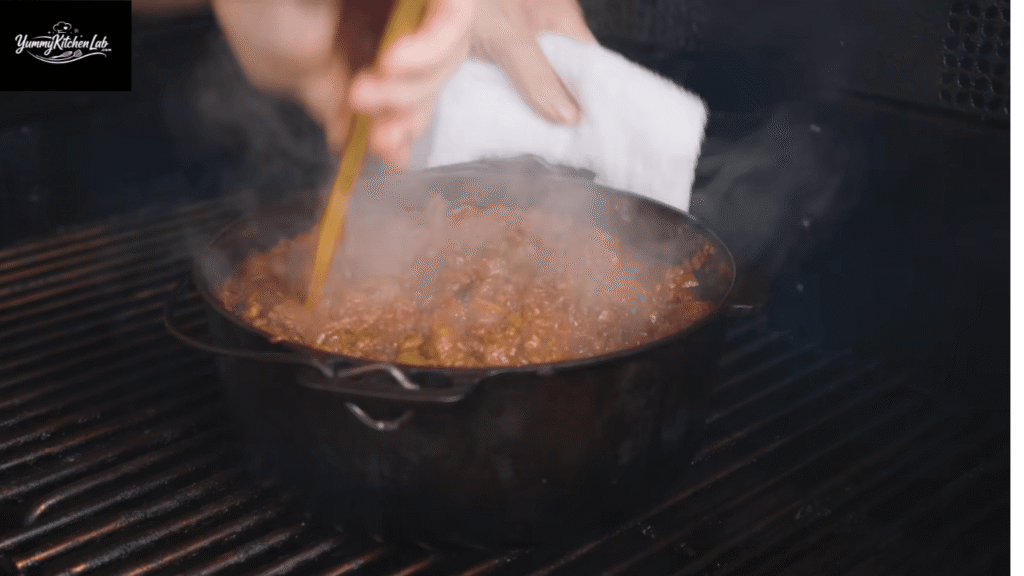
Step 7: Simmer Low and Long
Set your pellet grill or smoker to 225°F and place the Dutch oven directly inside. Hickory pellets work well here and complement the chili’s flavor. Let it go for six to eight hours and stir occasionally when you check on it. If you’re cooking indoors, a slow cooker on low all day works great, or you can simmer on the stovetop at the lowest setting for at least three hours. If a dark film forms on the surface during a long cook, just skim it off and move on. It’s not a problem, and the chili underneath is perfectly fine.
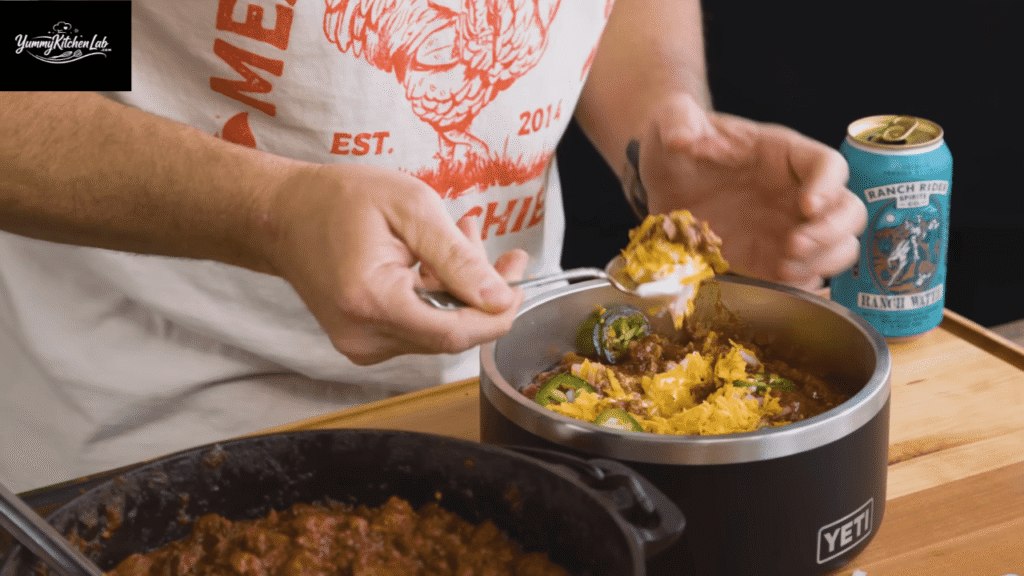
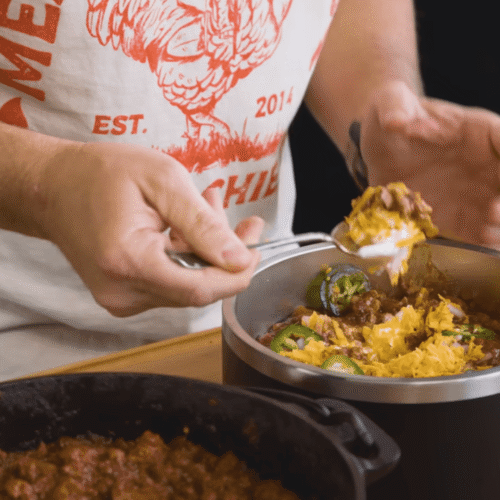
Step 8: Taste, Adjust, and Serve
After the long cook, taste the chili and decide if it needs anything. Then serve it up. Matt goes with diced white onion, sliced jalapeños, freshly grated cheddar, and a solid dollop of sour cream. One thing worth repeating: always grate your own cheese. Pre-shredded cheese contains anti-caking powder that stops it from melting properly, and you deserve better than that on a chili this good.
Pro Tips to Make the Perfect Meat Church Chili
The gap between good chili and genuinely great chili usually comes down to a handful of small decisions. Here are the ones that matter most with this recipe.
Smoke the chuck roast the day before. Getting it done ahead of time removes all the pressure on cook day and gives you better smoke penetration. Cold meat is also easier to slice cleanly.
Hunt down the coarse chili grind. Standard ground beef works, but the coarser grind holds up better through hours of simmering and gives the chili real substance. Most butchers will do it if you ask.
Leave a little fat from the sausage. A small amount of breakfast sausage fat adds body and richness to the chili. Draining every last drop takes flavor out of the pot that you actually want in there.
Low and slow is non-negotiable. Three hours on high produces okay chili. Eight hours at 225°F produces something your friends will ask you to make again. The time breaks down the collagen in the chuck roast and builds depth that shortcuts cannot replicate.
Add the beer after the tomatoes. Pouring the beer in last means it doesn’t cook off during assembly. It stays present in the finished chili rather than evaporating before the cook even starts.
Taste right before you serve. Eight hours of simmering concentrates everything. What tasted balanced at hour two might need a pinch of salt or an extra hit of seasoning by the time it’s done. Always taste last.
Plan for leftovers. This chili genuinely tastes better on day two. The flavors meld in the fridge overnight and the texture improves. Store it in an airtight container for up to four days or freeze portions for up to three months.
Cut the recipe in half if needed. This is a big batch recipe built for feeding a crowd. If you’re cooking for a smaller group, halve everything. The ratios stay the same and the cook time doesn’t change.
Serving Ideas
This chili is a full meal on its own, but how you serve it shapes the whole experience. Here are four ways to make it work for different situations.
Classic Bowl with Full Toppings
This is the no-overthinking version. Deep bowl, diced white onion, fresh jalapeño slices, freshly grated sharp cheddar, and a generous spoonful of sour cream. Cornbread or thick-cut saltines on the side. This is the weeknight dinner or lazy Sunday lunch format, and it’s the version that makes people ask for the recipe.
Cook-Off Presentation
When you’re taking this to a competition or neighborhood event, presentation works alongside flavor. Serve in smaller tasting cups with a single jalapeño round on top, a light dusting of chili seasoning over the cheese, and a thin drizzle of sour cream rather than a blob. It looks considered and makes it easy for judges to evaluate in one clean bite.
Chili Dogs and Chili Fries
This thick, meaty chili works brilliantly as a topping. Spoon it over hot dogs in toasted buns with yellow mustard and diced onion for a proper Texas-style chili dog. Or pile it over a sheet of crispy fries and melt shredded cheese on top under the broiler for three minutes. Both options stretch the batch significantly if you’re feeding a bigger crowd.
Game Day Camp Setup
Matt recommends Yeti Rambler mugs for serving because they’re insulated and you can walk around with them. For a tailgate or watch party, keep the chili warm in the Dutch oven on a portable burner and set up a topping bar with cheese, onion, jalapeños, sour cream, and avocado slices. Matt’s specific pairing recommendation from the video is Ranch Water, which is sparkling water, fresh lime juice, and tequila over ice. It cuts through the richness of the chili perfectly.
For presentation at any occasion, a large cast iron Dutch oven sitting on a wooden trivet in the center of the table does more for the vibe than any serving bowl. It keeps the chili hotter for longer and makes the whole thing feel like an event.
Frequently Asked Questions
Can I make this chili without a smoker?
Yes, and it still comes out really well. Sear the chuck roast hard in a cast iron skillet before cutting it up to develop a good crust and some depth of flavor. For the cook itself, use a slow cooker on low for eight hours or simmer on the stovetop at the lowest heat setting for at least three hours. To make up for the missing smoke, lean harder on the chipotle peppers and use fire-roasted or chipotle-flavored canned tomatoes instead of plain.
Do I have to use Meat Church Chili Seasoning?
No. It’s Matt’s product and it’s built specifically for this recipe, but any quality Texas-style chili seasoning blend will get you there. Look for one that lists actual dried chile peppers near the top of the ingredients rather than just generic “chili powder.” If you’re using something new, start with three to four tablespoons, taste the chili after a couple of hours, and add more if it needs it.
Can I add beans to this recipe?
You can, and Matt says so directly in the video. Kidney beans or pinto beans added in the last two hours of cooking are the most common choices. The chuck roast already handles the heartiness that beans would normally provide, so beans aren’t necessary here. But if that’s how your family makes chili, there’s no reason to leave them out.
How do I store and reheat leftovers?
Let the chili cool completely before moving it to airtight containers. It keeps in the refrigerator for up to four days and freezes well for up to three months. When reheating, do it on the stovetop over medium-low heat with a splash of beef broth or water to loosen it up. The chili thickens quite a bit as it sits, so don’t skip the liquid. Microwaving large portions heats unevenly, so stovetop is the better call.
Can I make this ahead of time for a party?
This is genuinely one of the best recipes to make a day ahead. Cook it the day before, refrigerate overnight, and reheat it low and slow before the party. The flavor on day two is noticeably better than day one as everything settles and melds together. You can also double the recipe for a large crowd. Just make sure your Dutch oven or slow cooker is big enough to handle the volume, and learn from Matt’s mistake of grabbing a pot that was just a little too small.
Wrapping It Up
The Meat Church chili recipe earns its reputation the honest way: real ingredients, real technique, and enough time for everything to come together properly. The smoked chuck roast is what sets it apart, and the long low-and-slow cook is what makes it genuinely better than the version you can pull off in an hour. Whether you’re entering a cook-off or just feeding your family on a cold weekend, this is the recipe that delivers every time. Give it a shot and see for yourself why it keeps showing up on winner boards.
meat church chili recipe
Ingredients
- 2 lb ground beef, 90/10, coarse chili grind
- 1 lb hot breakfast sausage
- Just over 2 lbs chuck roast, smoked or seared
- 3 red onions, diced
- 1 full head of garlic, minced
- 1 can chipotle peppers in adobo sauce, with all sauce
- 5 tablespoons Meat Church Chili Seasoning
- 56 oz diced tomatoes, fire-roasted preferred
- 28 oz crushed tomato sauce
- 1 Bock beer or dark lager
Instructions
- Smoke chuck roast at 225°F for 4 to 5 hours or overnight. Cut into 1 to 2 inch chunks.
- Sauté diced onions, garlic, and chipotle peppers in a skillet for 10 minutes. Set aside.
- Brown ground beef and breakfast sausage together. Drain excess fat.
- Combine all meats and aromatics in a large Dutch oven. Stir in chili seasoning.
- Add all canned tomatoes with their juices. Pour in the beer. Stir to combine.
- Simmer at 225°F on a pellet grill or in a slow cooker on low for 6 to 8 hours.
- Stir occasionally. Skim any film that forms on the surface.
- Taste, adjust seasoning, and serve with desired toppings.
Video
Notes
- No pellet grill? Simmer on the stovetop on the lowest setting for at least 3 hours.
- Refrigerate up to 4 days. Freeze up to 3 months. Flavor improves on day two.
- For milder heat, use regular breakfast sausage and reduce seasoning to 3 tablespoons.