

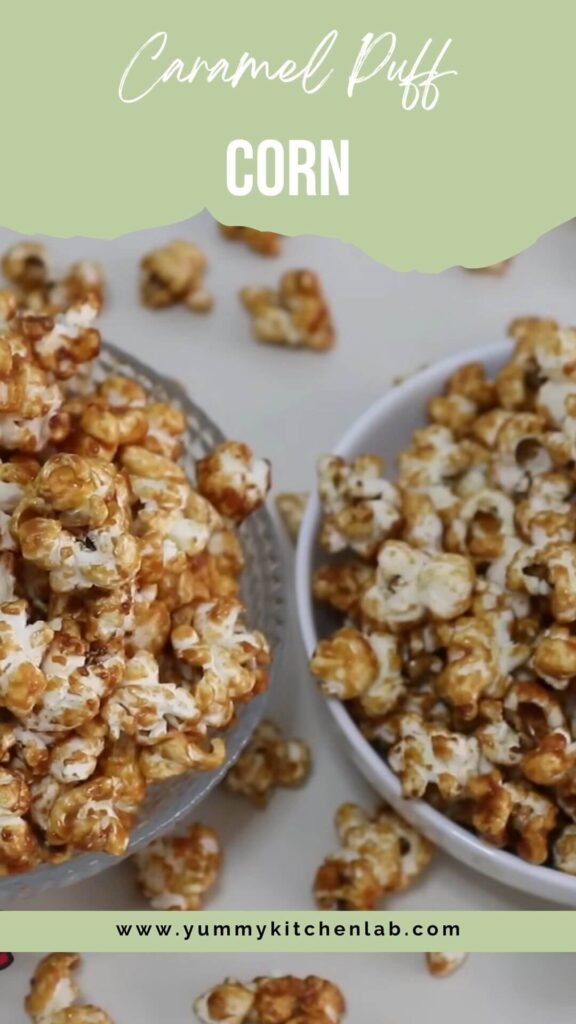
Okay, real talk. You know that snack you make for movie night that somehow vanishes before the opening credits even finish? That’s caramel puff corn. It’s sweet, crunchy, coated in homemade caramel, and frankly a little dangerous to have around the house.
- Ingredients for Caramel Puff Corn
- How to Make Caramel Puff Corn (Step by Step)
- Step 1: Pop Your Corn on the Stovetop
- Step 2: Cover and Cook Until the Popping Stops
- Step 3: Transfer the Popcorn and Set Up for Caramel
- Step 4: Melt the Sugar Over Low Heat
- Step 5: Add Butter and Stir Fast
- Step 6: Add Milk Slowly and Keep Stirring
- Step 7: Cook the Caramel Until It Thickens
- Step 8: Pour the Caramel Over the Popcorn Immediately
- Step 9: Serve Warm or Let It Cool and Set
- Pro Tips to Make the Perfect Caramel Puff Corn
- Serving Ideas
- Frequently Asked Questions
- Can I use microwave popcorn instead of popping my own?
- Why did my caramel turn grainy instead of smooth?
- Can I make this recipe without dairy?
- My caramel turned dark brown and tastes bitter — what went wrong?
- Caramel Puff Corn
The best part? You only need five basic ingredients and about 25 minutes. No candy thermometer, no stand mixer, no culinary degree required. Just a pot, a pan, and a little patience with the caramel.
This recipe is the kind of thing that looks impressive but is actually very forgiving once you understand a couple of key steps. I’m going to walk you through every one of them so your first batch comes out perfectly.
“The best snacks are the ones that feel special but cost almost nothing to make.”
That pretty much sums up caramel puff corn. This recipe draws from a long tradition of stovetop caramel corn made across Latin America, Southeast Asia, and home kitchens worldwide. The technique is simple: make caramel from scratch, fold it into freshly popped corn, and let the magic happen.
What makes the homemade version so much better than the bagged stuff at the store is control. You decide how dark the caramel goes. You decide how thick the coating gets. Once you try it this way, the supermarket version will honestly feel like a downgrade.
Ingredients for Caramel Puff Corn
You only need five ingredients for this recipe, and every single one plays a specific role. Using the right type and quality for each one makes the difference between a sticky, chewy mess and a perfectly caramel-coated crunch.
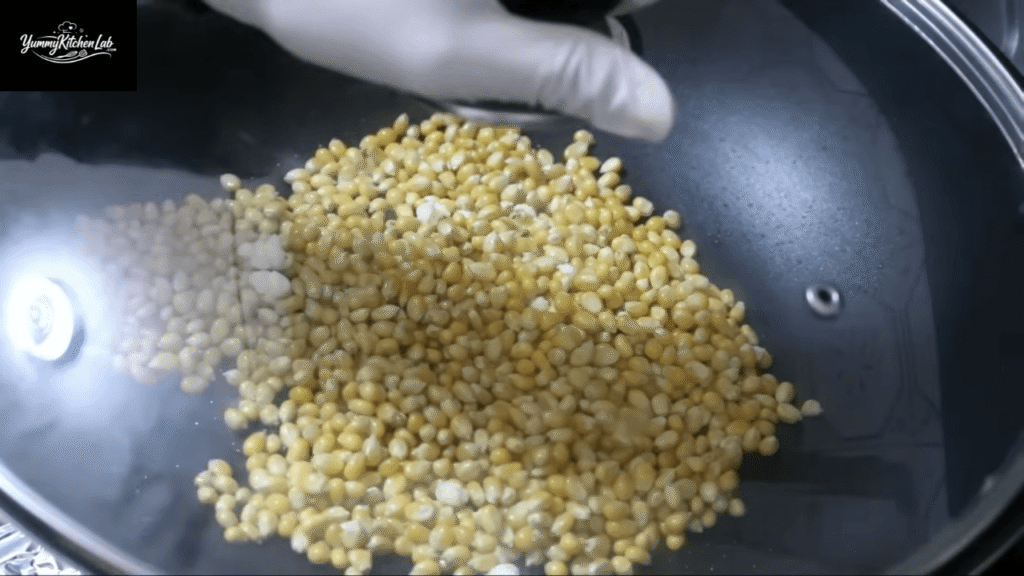
Corn (Popcorn Kernels)
The corn is the foundation of this whole recipe, so this is not the place to cut corners. Use standard yellow popcorn kernels, not pre-flavored microwave bags. Microwave popcorn contains added butter, salt, and artificial flavoring that will mess with how the caramel sticks to the surface. Plain kernels popped fresh on the stovetop give you a light, airy base that absorbs the caramel coating beautifully without turning soggy.
FYI, if you see a variety labeled “mushroom” corn at the store, it actually works really well for this recipe since it pops into a rounder, chunkier shape that holds more caramel per piece. But standard kernels are totally fine and easier to find.
Cooking Oil
You need oil to pop the corn, and the type you choose actually matters. Go for a neutral oil with a high smoke point like vegetable oil, sunflower oil, or refined coconut oil. Avoid olive oil entirely. It smokes at a lower temperature and leaves behind a flavor that fights with the caramel instead of letting it shine.
Two tablespoons is the right amount for one cup of kernels. It’s enough to coat the bottom of the pot and transfer heat evenly without leaving your popcorn tasting greasy. The most common mistake here is using too little oil, which causes uneven popping and burnt kernels at the bottom of the pot.
Salt
A pinch of salt before the corn pops might seem like a throwaway step, but it’s doing real work here. Salt amplifies sweetness, which is exactly why salted caramel became such a thing. That tiny pinch makes the caramel coating taste more intense and balanced once everything comes together.
Standard fine table salt is all you need. If you want to push the sweet-salty contrast even further, sprinkle a small pinch of flaky sea salt over the finished caramel puff corn right before serving. Totally optional, but IMO it takes the whole thing up a notch.
Sugar
This is the star ingredient of the caramel, so use it right. Stick with plain white granulated sugar and avoid powdered sugar or brown sugar as your base. White sugar melts cleanly into a smooth, amber caramel that coats the corn evenly. Brown sugar burns faster, has more variables, and is harder to control without a thermometer.
The recipe uses 100 grams, which is roughly half a cup. Melt it slowly over low heat and resist the urge to stir it before it’s ready. Patience is genuinely the skill being tested here. Rushing it over high heat is the number one reason homemade caramel turns bitter, and there’s no coming back from that.
Butter
One tablespoon of butter goes into the caramel once the sugar has melted, and the transformation is immediate. Butter adds richness and gives the caramel that glossy, smooth finish that makes this recipe look professional. Use unsalted butter so you’re in control of the salt level throughout.
If you need a dairy-free option, a good quality vegan butter made with coconut oil will work. Just don’t try substituting regular cooking oil here. Oil doesn’t emulsify into hot caramel the way butter does, and you’ll end up with a greasy, uneven coating instead of a glossy one.
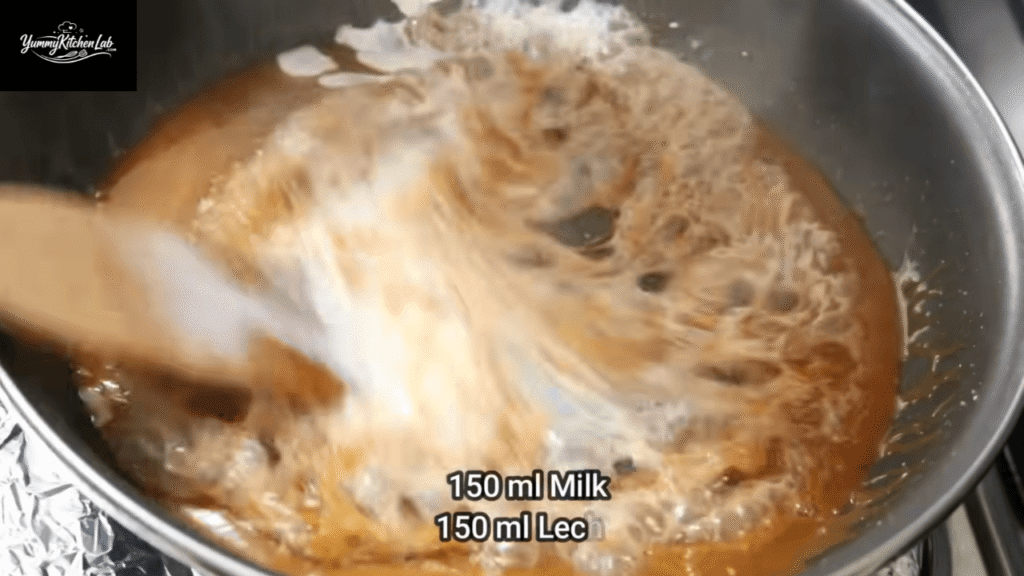
Milk
Milk is what turns your thick melted sugar into an actual pourable caramel sauce. Add 100ml of whole milk slowly and gradually while stirring constantly. If you dump it all in at once, the caramel will seize up or splatter everywhere, and neither outcome is fun.
Whole milk works best because the fat content helps stabilize the caramel and keeps it smooth. If you want something richer, evaporated milk is a great substitute. For a dairy-free version, full-fat oat milk or coconut milk both hold up reasonably well in this recipe.
How to Make Caramel Puff Corn (Step by Step)
Step 1: Pop Your Corn on the Stovetop
Add two tablespoons of cooking oil to a large, heavy-bottomed pot and heat it over medium heat. Add one cup of popcorn kernels and a pinch of salt, then give everything a quick mix to coat the kernels in the oil. A heavy-bottomed pot is worth using here because it distributes heat evenly and reduces the chance of burning the kernels before they pop.

Step 2: Cover and Cook Until the Popping Stops
Place a lid on the pot and drop the heat down to low to medium. Let the corn pop undisturbed until the popping slows down to about one pop every two to three seconds. That usually takes around 45 to 60 seconds from the first pop. Do not keep lifting the lid to check on it. Every time you do, you lose heat and steam, and that leads to uneven popping and sad, half-popped kernels.
Step 3: Transfer the Popcorn and Set Up for Caramel
Once the popping has slowed to almost nothing, take the pot off the heat and transfer the popcorn to a large mixing bowl. Set it aside and leave it there. Now grab a clean, dry pan for the caramel. Dry is key because even a few water droplets in the pan can cause the sugar to crystallize instead of melting smoothly. Use a light-colored or stainless steel pan so you can actually see the color of the caramel as it develops.
Step 4: Melt the Sugar Over Low Heat
Add 100 grams of granulated sugar to your dry pan and place it over low heat. Do not stir it. Just let it sit and start melting from the bottom up. Once the edges start to turn amber and liquefy, you can gently swirl the pan to even out the heat. The sugar is ready when it reaches a deep, even amber color throughout. Pale yellow means it needs more time. Dark brown means you’ve gone too far and it’s heading toward bitter.
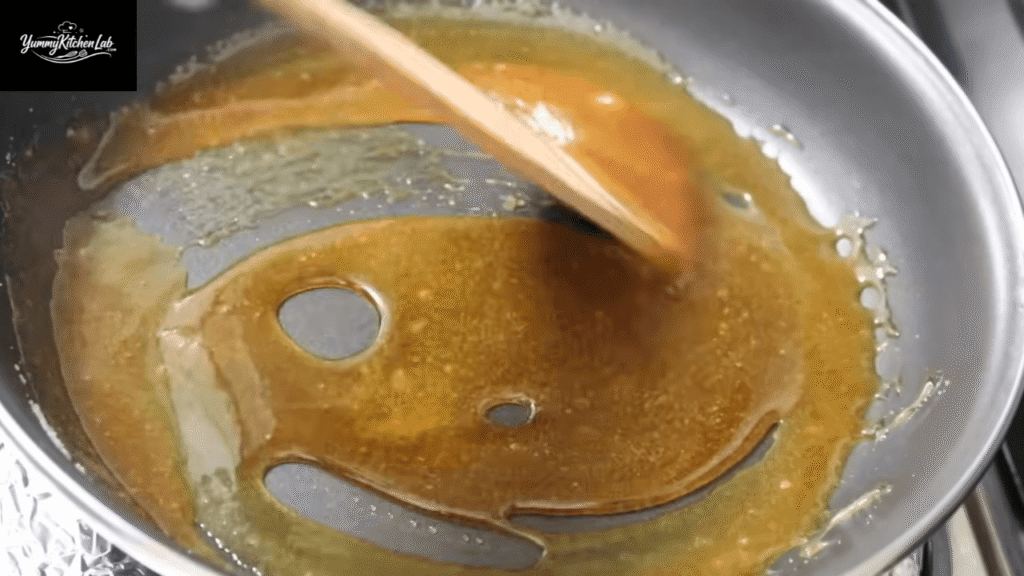
Step 5: Add Butter and Stir Fast
The moment the sugar hits that deep amber color, add one tablespoon of butter directly into the pan. It will bubble up aggressively, and that’s completely normal. Keep your face back from the pan and use a long-handled spoon. Stir quickly and continuously until the butter is fully incorporated and the mixture looks smooth and glossy.
Step 6: Add Milk Slowly and Keep Stirring
With the pan still on low heat, start adding the 100ml of milk. Do it gradually, not all at once. Pour in a small splash, stir until it’s fully combined, then add a little more. Keep going until all the milk is in. This step is where most people get impatient, and that impatience leads to lumpy, separated caramel. Slow and steady genuinely wins here.
Step 7: Cook the Caramel Until It Thickens
Keep stirring the caramel over low heat until it thickens enough to coat the back of a spoon. This takes a few minutes. You want it pourable but not watery. If it’s too thin when it hits the popcorn, it will slide off and pool at the bottom of the bowl instead of giving every piece a proper coating.
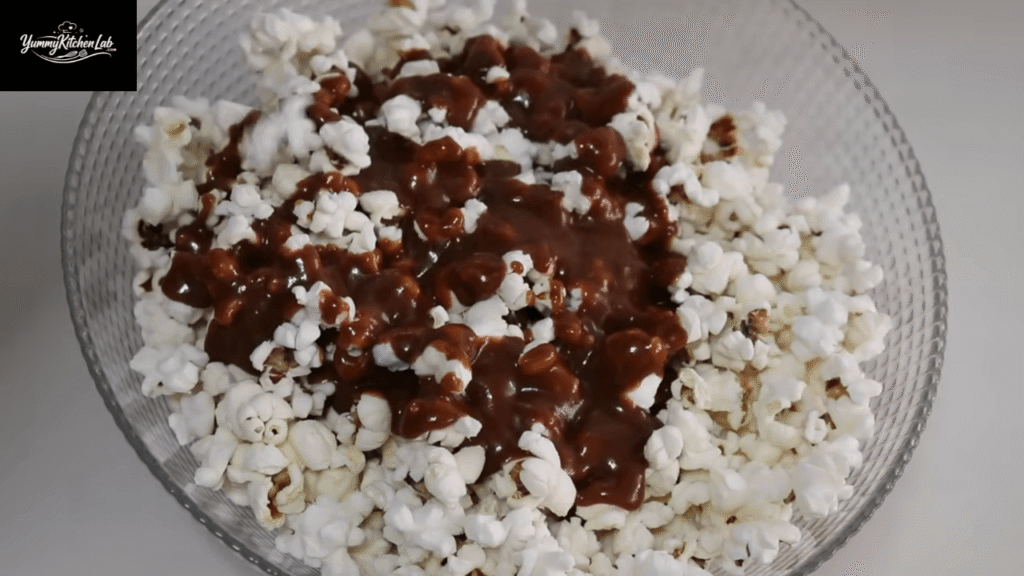
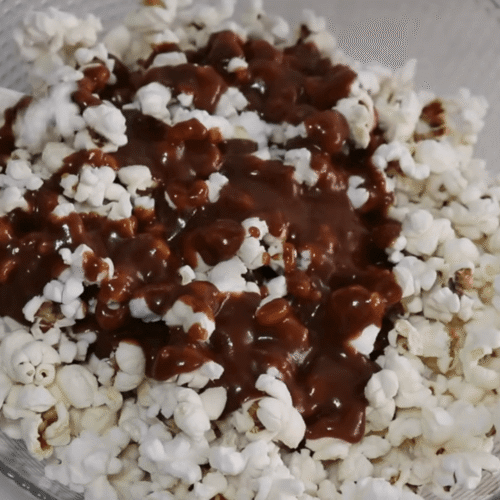
Step 8: Pour the Caramel Over the Popcorn Immediately
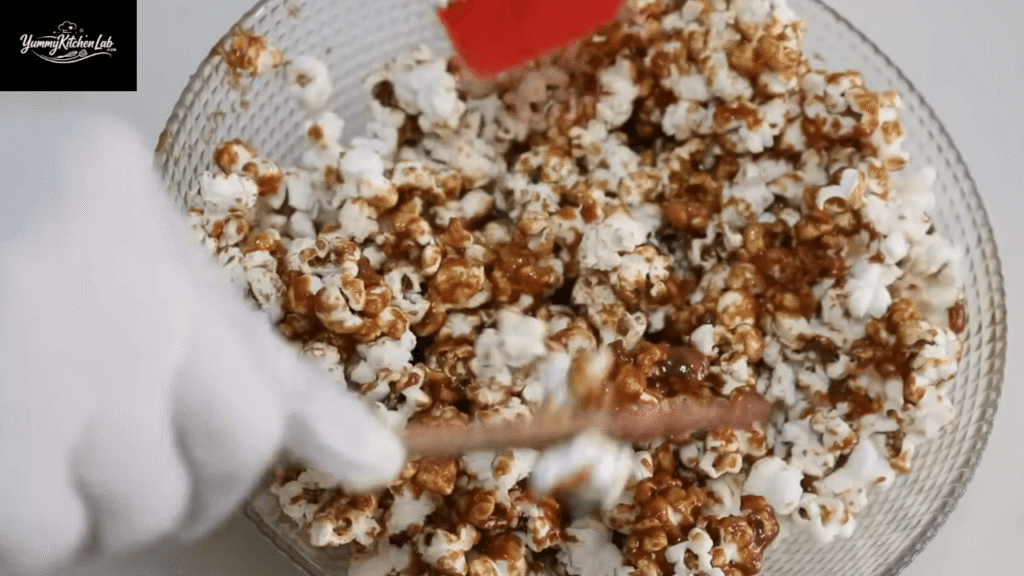
Pour the hot caramel directly over the popcorn in your large mixing bowl. Move fast here because caramel starts setting as it cools. Use a large spoon or spatula to fold the caramel through the popcorn, turning it gently to coat every piece. Don’t press down or smash the corn while you’re mixing. The goal is to coat it, not crush it.
Step 9: Serve Warm or Let It Cool and Set
Transfer the caramel puff corn to a serving bowl or spread it across a sheet of parchment paper to cool. Warm caramel puff corn is soft and gooey in the best way. Once it cools completely, it sets into a satisfying crunch that holds up for days. Both versions are delicious, just different experiences.
Pro Tips to Make the Perfect Caramel Puff Corn
Little things make a big difference with this recipe. Here are the tips that separate a good batch from a truly great one.
Low heat is non-negotiable for the caramel. High heat gives you bitter, burnt sugar and there’s no fixing it once it happens. Stay patient, stay low, and let the caramel develop at its own pace.
Dry your pan before you start. Even tiny water droplets can make the sugar crystallize and turn grainy instead of melting into a smooth caramel. Wipe the pan dry every time, no exceptions.
Pop your corn before you start the caramel. Once the caramel is ready, you have maybe 60 seconds before it starts setting. If you’re still waiting on the popcorn, you’ve already lost the window.
Use a much bigger bowl than you think you need. Tossing caramel-coated popcorn in a bowl that’s too small is a guaranteed mess. Bigger bowl, less cleanup, better coating distribution.
Add a pinch of baking soda for a lighter, crunchier coating. This isn’t in the original recipe, but stirring a tiny pinch of baking soda into the caramel just before pouring creates small air bubbles that make the coating noticeably lighter and crunchier. Totally worth trying.
Spread on parchment paper if you want separate pieces. Pouring the coated corn onto a parchment-lined baking sheet and letting it cool flat gives you individual crunchy pieces instead of a big cluster. Both are great, but the separate pieces are easier to snack on without making a mess.
Keep it at room temperature, not in the fridge. An airtight container at room temperature keeps it crunchy for up to three days. The fridge introduces moisture, which turns it sticky and soft. Room temp is the right call every time.
Make the caramel in batches if you’re scaling up. Doubling or tripling the popcorn is easy. Just don’t double the caramel in one pan. A larger volume of sugar is much harder to control without burning. Make two smaller batches of caramel instead.
Serving Ideas
Caramel puff corn is one of those snacks that genuinely works in almost any setting. Here are four ways to serve it that each bring something a little different to the table.
Movie Night Snack Bowl
Set out a big bowl of warm caramel puff corn alongside kettle chips, dark chocolate pieces, and a handful of roasted nuts. The contrast between sweet caramel corn and salty, savory snacks makes every handful more interesting. This is the classic setup and it works every single time.
Homemade Gift Bags
Let the caramel puff corn cool completely, then portion it into clear cellophane bags tied with ribbon. It holds its crunch for up to three days, which makes it a practical and genuinely thoughtful homemade gift. Pair it with a small jar of hot chocolate mix and you’ve got a complete little treat package that people actually appreciate.
Kids’ Party Table
Caramel puff corn is a natural hit with kids because it’s sweet, light, and not too messy. Serve it in individual paper cones or small cups to keep portions under control. Pair it with fruit skewers and lemonade for a simple, low-effort party spread that still looks like you put thought into it.
Dessert Topping
Crush a small handful of caramel puff corn and sprinkle it over vanilla ice cream, chocolate mousse, or a banana split. The caramel coating pairs naturally with creamy desserts, and the crunch adds a textural contrast that makes even a simple scoop of ice cream feel more interesting.
For presentation, a wide, shallow bowl shows off the golden caramel coating far better than a deep one. A natural wood serving board lined with parchment paper also works well if you’re laying it out for guests or photographing it. The color of the caramel is the visual highlight here, so let it take center stage.
Frequently Asked Questions
Can I use microwave popcorn instead of popping my own?
You can, but the results won’t be as good. Pre-popped microwave corn often contains added butter, salt, and flavoring that interferes with how the caramel adheres to the surface. Plain stovetop-popped kernels give you a neutral, clean base that takes on the caramel coating much more evenly.
Why did my caramel turn grainy instead of smooth?
Grainy caramel is almost always caused by one of two things: either the pan had moisture in it before you started, or you stirred the sugar too early while it was melting. Next time, dry your pan thoroughly and resist stirring until the sugar is at least halfway melted around the edges.
Can I make this recipe without dairy?
Yes. Substitute the butter with a good quality vegan butter and replace the milk with full-fat oat milk or coconut milk. The texture will be slightly softer and the flavor will have a different undertone, but it works well enough to satisfy anyone avoiding dairy.
My caramel turned dark brown and tastes bitter — what went wrong?
The caramel cooked too long or over heat that was too high. Once sugar goes past deep amber into dark brown, the bitterness is locked in and cannot be reversed. The safest fix for next time is to pull the pan off the heat the moment it hits a deep golden amber — it will continue cooking from residual heat for another few seconds even off the burner.
Caramel Puff Corn
Ingredients
- 1 cup popcorn kernels
- 2 tbsp neutral cooking oil (vegetable or sunflower)
- Pinch of fine salt
- 100g (½ cup) white granulated sugar
- 1 tbsp unsalted butter
- 100ml whole milk
Instructions
- Heat oil in a large pot over medium heat
Video
Notes
- For extra crunch, stir a tiny pinch of baking soda into the caramel just before pouring.
- Store in an airtight container at room temperature for up to 3 days.
- For dairy-free: use vegan butter and full-fat oat milk or coconut milk.