
Your sourdough starter is sitting in the fridge right now, quietly judging you for only making pancakes with it. It’s time to give that bubbly little jar a real job.
- Ingredients for Sourdough Discard Bagels
- Warm Water (250g)
- Active Sourdough Starter (150g)
- Sugar (40g)
- Bread Flour (500g)
- Salt (10g)
- Honey for the Boil Bath (20g)
- How to Make Sourdough Discard Bagels (Step by Step)
- Step 1: Combine the Wet Ingredients
- Step 2: Add the Flour and Salt
- Step 3: Knead by Hand for 5 to 6 Minutes
- Step 4: Rest for 60 Minutes, Then Knead Again Briefly
- Step 5: Bulk Ferment Until Doubled
- Step 6: Shape Into Dough Balls
- Step 7: Shape the Bagels
- Step 8: Boil the Bagels
- Step 9: Add Toppings and Bake
- Pro Tips for Perfect Sourdough Bagels
- 4 Delicious Ways to Serve Sourdough Bagels
- Classic Bagel Breakfast Sandwich
- Asiago Cheese Bagel with Whipped Butter
- Smoked Salmon and Cream Cheese Board
- Turkey and Avocado Lunch Bagel
- Frequently Asked Questions
- Can I use sourdough discard instead of active starter?
- What if my dough feels too stiff or dry?
- How should I store leftover bagels?
- Can I make the dough the night before?
- Why did my bagels come out dense?
- Sourdough Discard Bagel Recipe
- Final Thoughts
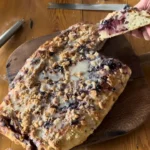
This sourdough discard bagel recipe produces chewy, golden, bakery-worthy bagels with a soft crumb and just the right amount of tang. And honestly? Once you pull your first batch out of the oven, every store-bought bagel you eat after that will feel like a personal betrayal. I’m not even being dramatic. Okay, maybe a little. But these are genuinely that good.
The magic here comes from combining traditional bagel-making techniques (yes, we’re boiling them) with the slow, flavor-building power of sourdough fermentation. They take longer than a quick yeast bagel, sure. But the depth of flavor you get from a long bulk ferment is something commercial yeast simply cannot replicate. It’s the difference between a bagel that tastes like bread shaped into a circle and a bagel that actually tastes like a bagel.
One important note before we get into it: this recipe uses active sourdough starter at its peak, not sad, neglected discard from the back of your fridge. Your starter needs to be fed, bubbly, and ready to work. More on that in a second.

Ingredients for Sourdough Discard Bagels
Every single ingredient in this recipe pulls its weight. Swapping things out without understanding the “why” behind them is the fastest way to end up with disappointing results.
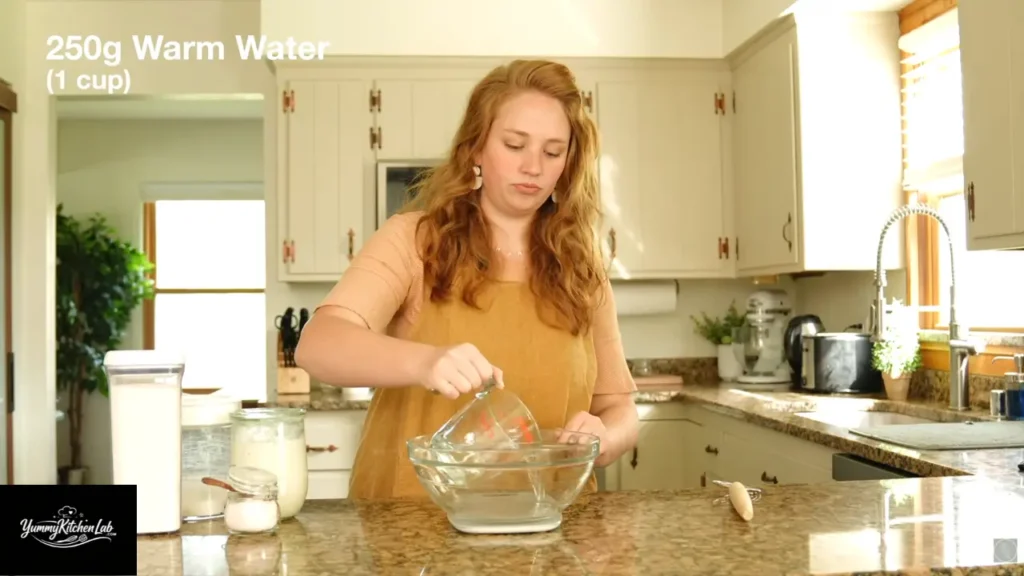
Warm Water (250g)
Water temperature matters way more than most people think. You want warm water, around 80 to 90°F, which should feel comfortably warm to the touch but not hot. Too cold and your fermentation stalls. Too hot and you risk killing the microbial culture in your starter. That would be a pretty rough start to bagel day.
Weigh it on a scale rather than using a measuring cup. It’s more accurate and takes the guesswork out entirely.
Active Sourdough Starter (150g)
This is the ingredient that makes or breaks everything. Your starter needs to be at peak activity: bubbly throughout, domed on top, and just about to fall. A starter that’s already collapsed will still technically work, but you’ll get less rise and flatter bagels. One that hasn’t peaked yet won’t have enough leavening power to do the job.
If you’re new to sourdough, check your starter every 30 to 60 minutes after feeding. Learn what “ready” looks like for your specific starter in your specific kitchen. It’s worth the attention.
Sugar (40g)
Sugar does two things here. It adds a subtle sweetness to the crumb, and it helps keep the interior soft and tender after baking. This isn’t about making sweet bagels. It’s about rounding out the sourness of the starter so the flavor feels balanced. Honey works as a 1:1 substitution by weight if you prefer it.
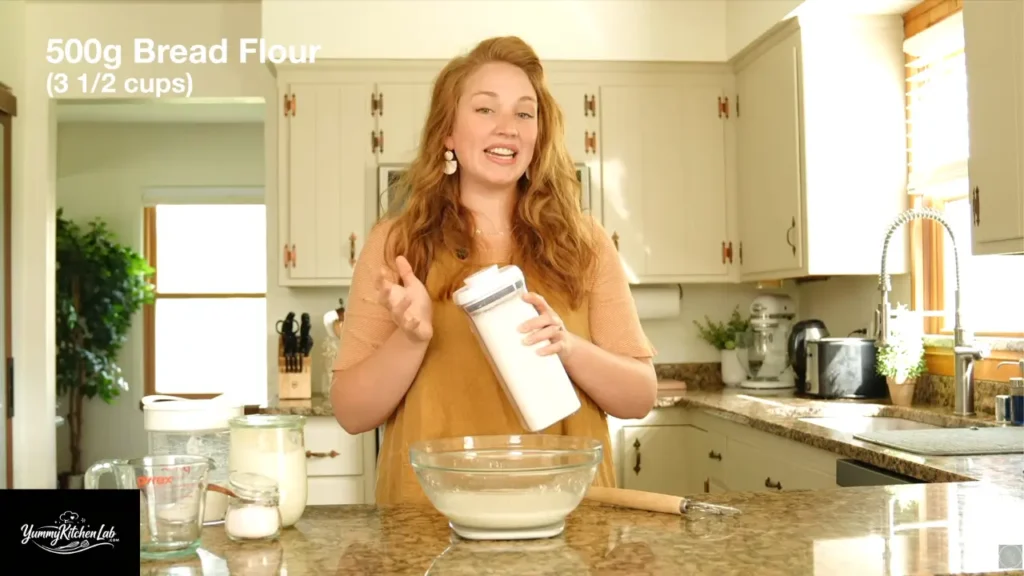
Bread Flour (500g)
Bread flour has more protein than all-purpose flour, and that extra protein builds the gluten structure that makes a bagel chewy instead of cakey. Can you use all-purpose? Sure. Will the texture be as good? Not really. The crumb turns out softer and less structured, which kind of defeats the purpose of making a bagel.
Always weigh your flour. A scooped cup and a weighed cup can differ by 30 grams or more. That’s enough to throw off your entire dough hydration.
Salt (10g)
Salt strengthens the gluten network, controls fermentation speed, and makes everything taste better. Don’t skip it and don’t eyeball it. Too much salt can actually slow down or inhibit fermentation, and too little leaves your bagels tasting flat. Stick with 10g.
Honey for the Boil Bath (20g)
The boil bath is what separates a real bagel from a round roll. Adding honey to the boiling water promotes browning in the oven and helps you get that gorgeous golden crust. Without something sweet in the water, your bagels come out pale and underwhelming. Maple syrup or brown sugar work as substitutes at the same weight.
How to Make Sourdough Discard Bagels (Step by Step)
Step 1: Combine the Wet Ingredients
Place a mixing bowl on your kitchen scale and zero it out. Add 250g of warm water, then 150g of active starter, then 40g of sugar. Mix everything together until the liquid looks milky white and the sugar dissolves completely.
A Danish dough whisk makes this easier and keeps your hands clean, but a regular spoon or even your hand works fine.
Step 2: Add the Flour and Salt
Add 500g of bread flour and 10g of salt to the bowl. Mix until most of the flour gets incorporated. The dough will look shaggy and rough at this point, and that’s completely normal.
This is a lower-hydration dough than most sourdough recipes, so it won’t come together smoothly right away. Resist the urge to add more water. It doesn’t need it. Trust the process.
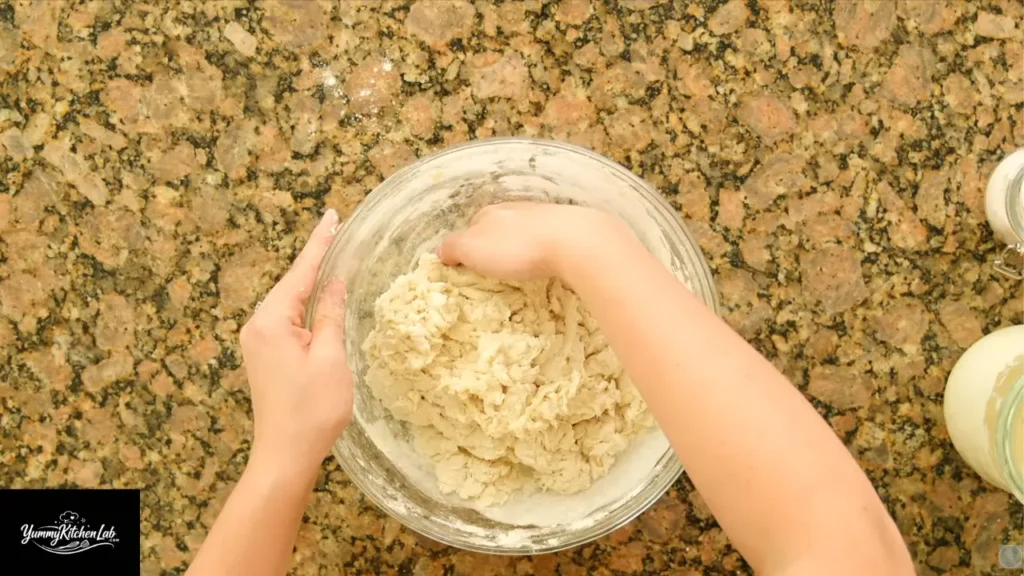
Step 3: Knead by Hand for 5 to 6 Minutes
Fold the bottom of the dough up and push it forward with the heel of your hand. Rotate the bowl slightly and repeat. Keep this going for 5 to 6 minutes. The dough will feel stiff and look bumpy. Both are totally normal for this recipe.
You can use a stand mixer with a dough hook on low speed for 4 to 5 minutes instead. But IMO, hand-kneading produces a noticeably better result with this particular dough. Something about the manual pressure develops the gluten more evenly.
Scrape the sides of the bowl occasionally to make sure all the flour gets worked in.
Step 4: Rest for 60 Minutes, Then Knead Again Briefly
Cover the bowl and let the dough rest for 60 minutes. After resting, knead for just 20 seconds. Fold, push, rotate, done.
You’ll notice an immediate difference. The dough transforms from stiff and rough to smooth and cooperative. That 60-minute rest lets the gluten relax, and the second quick knead brings everything together beautifully. Don’t skip this rest. It’s not just a break. It’s doing real work.
Step 5: Bulk Ferment Until Doubled
Cover the bowl and leave the dough at room temperature until it doubles in size. In a 70°F kitchen, this takes roughly 8 to 12 hours. A warmer kitchen speeds things up. A cooler one slows them down.
Here’s the most important piece of advice for this entire recipe: trust your dough, not the clock. Check it periodically. You want it domed, smooth on top, and tacky but not sticky when you touch it. If it’s sticky, you’ve likely over-fermented, and the bagels will spread flat instead of holding their shape.
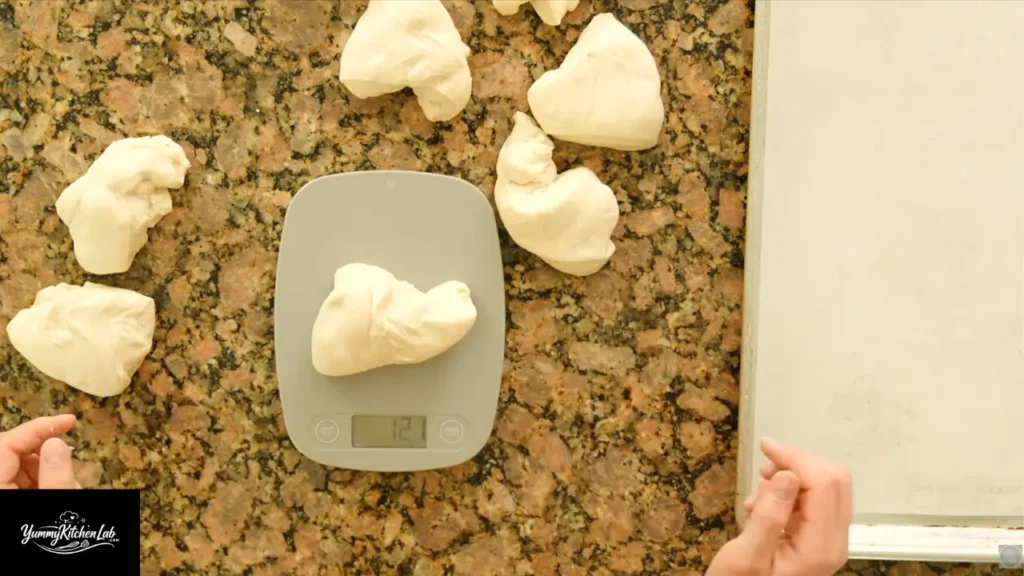
Step 6: Shape Into Dough Balls
Line a rimmed baking sheet with parchment paper. Gently turn the dough out of the bowl and flatten it into a rough rectangle.
Use a bench scraper or sharp knife to divide it into 8 pieces of roughly 115g each. For each piece, fold the corners toward the center, flip it over, and cup it with your hand to build surface tension. Roll it lightly on the counter to smooth the bottom. You should end up with eight tight, smooth dough balls.
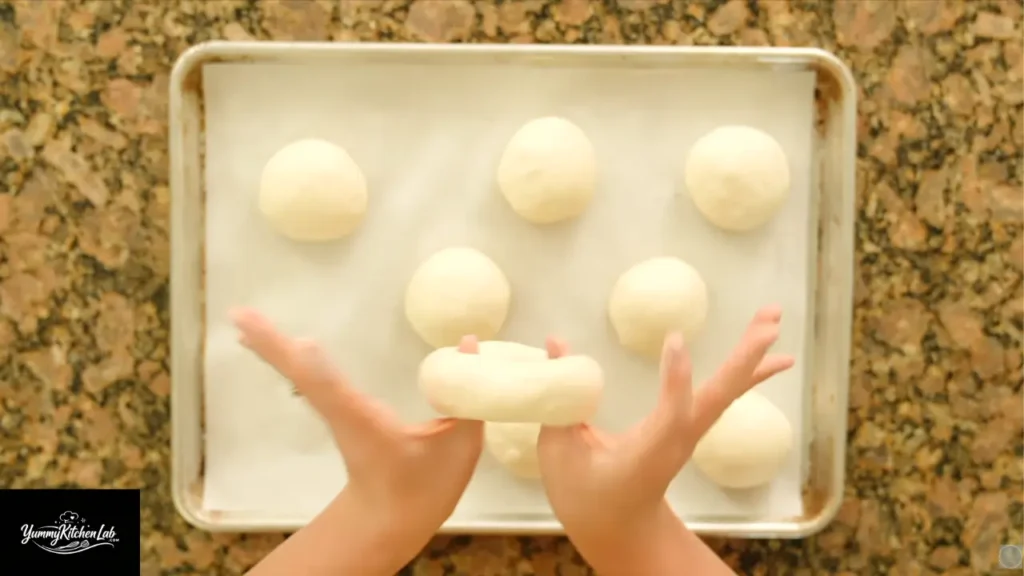
Step 7: Shape the Bagels
Take a dough ball and press your thumbs into the center from the top while supporting the bottom with your middle fingers. Pinch to create a hole, then stretch gently until the opening is about 2 inches across. It will retract a bit, and that’s fine.
Place each shaped bagel back on the parchment and repeat with the rest. Cover them and let them rest until they puff slightly, anywhere from 20 to 60 minutes depending on your kitchen temperature.
Pro tip: Stretch the hole wider than feels right. It shrinks significantly during proofing and baking. A 2-inch hole at shaping can close up almost entirely by the time the bagel is done.
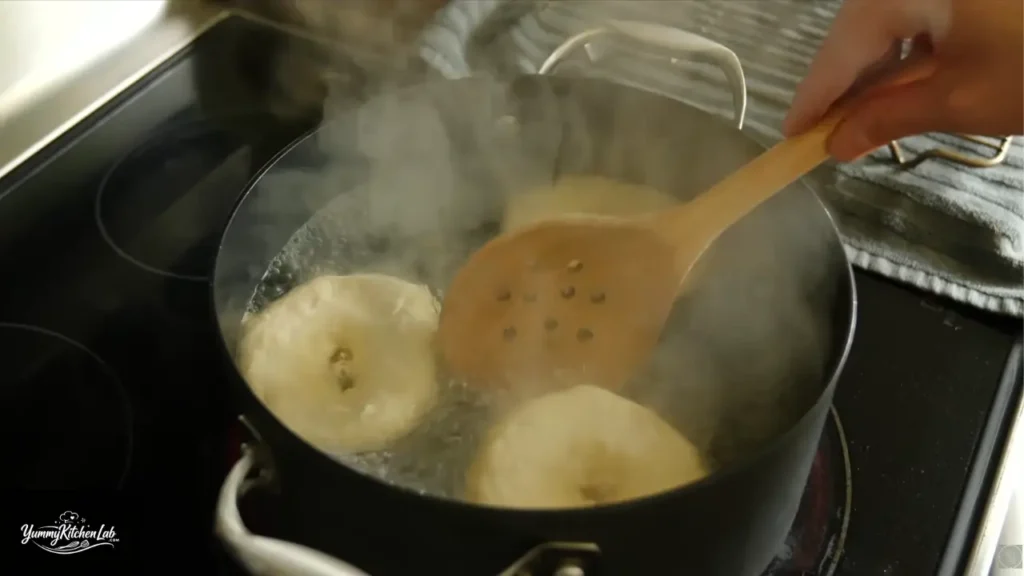
Step 8: Boil the Bagels
This step is non-negotiable. Boiling is what makes a bagel a bagel instead of just a round bread roll. It sets the exterior and creates that chewy, dense crust that you’re after.
Bring a large pot of water to a boil and stir in 20g of honey. Boil each bagel for 30 seconds per side. Set up a wire rack on a tea towel next to the pot to catch drips as you transfer the boiled bagels back to the baking sheet.
Step 9: Add Toppings and Bake
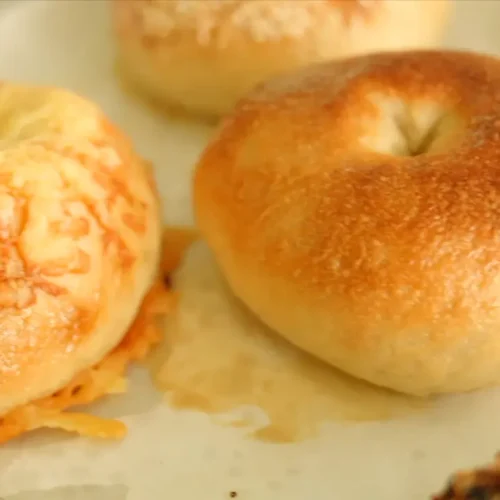
While the bagels are still slightly damp from boiling, dip them into your chosen toppings. Everything bagel seasoning, sesame seeds, and asiago cheese all work beautifully.
Here’s a trick I love for cheese-topped bagels: sprinkle some cheese directly onto the parchment underneath each bagel before baking. As it melts and crisps up, it creates this incredible crunchy cheese layer on the bottom. It’s a total game-changer.
Bake at 425°F for 20 to 25 minutes until the tops turn a deep golden brown.

Pro Tips for Perfect Sourdough Bagels
These small details separate a good batch from a truly great one.
- Use your starter at peak, not past it. A starter that has already fallen will still leaven the dough, but you’ll get a slower rise and less complex flavor. Watch for the dome shape and bubbles throughout. That’s your green light.
- Always weigh your ingredients. Volume measurements are wildly inconsistent, especially with flour. A scooped cup can differ from a properly weighed cup by 30+ grams. That changes your dough hydration noticeably.
- Don’t skip the 60-minute rest. It allows gluten to relax and makes the dough dramatically easier to shape. Without it, the dough stays springy and fights you during shaping.
- Trust your dough, not the clock. Bulk fermentation varies with kitchen temperature. Look for doubled size, a domed surface, and tacky (not sticky) texture. Those signs matter more than the hours.
- Always use parchment paper. Bagels without parchment will stick to the pan with a stubbornness that borders on impressive. Parchment also makes transferring baked bagels easy without messing up your toppings.
- Never skip the boil. Unboiled bagels are just soft rolls. The honey in the water promotes browning, and the boiling sets that chewy exterior. This is what makes a bagel a bagel.
- Put cheese on the bottom too. For asiago or any cheese-topped variety, sprinkle cheese directly on the parchment under each bagel. It melts into a crispy, savory, cracker-like base that adds incredible texture.
- Stretch the hole wider than you think. The hole closes up a LOT during proofing and baking. Stretch it further than feels right during shaping. Future you will appreciate it.
4 Delicious Ways to Serve Sourdough Bagels
These bagels work for any meal and pair well with a wide range of flavors. Here are my four favorite ways to enjoy them.
Classic Bagel Breakfast Sandwich
Toast a plain or everything-seasoned bagel and load it up with a scrambled or fried egg, sharp white cheddar, and a few slices of prosciutto or smoked ham. The sourdough tang plays off the rich egg and salty meat perfectly. This works especially well with day-two bagels, when toasting brings the crust right back to life.
Asiago Cheese Bagel with Whipped Butter
The asiago-topped bagel is rich enough that it barely needs anything else. Spread on a thin layer of whipped salted butter and you’re done. Serve it alongside a simple green salad with a sharp vinaigrette and a bowl of tomato soup for a lunch that feels way more put-together than the effort involved.
Smoked Salmon and Cream Cheese Board
Slice sesame or plain bagels and arrange them on a board with whipped cream cheese, cold smoked salmon, thinly sliced red onion, capers, and lemon wedges. This setup is perfect for weekend brunch or a casual gathering. The sesame seeds on the bagel echo the flavors in the salmon without competing with them.
Turkey and Avocado Lunch Bagel
An everything-seasoned or plain bagel makes a fantastic lunch sandwich base. Layer sliced turkey, thin avocado, sharp mustard, and a few leaves of arugula. The sourdough chew holds up to fillings way better than standard sandwich bread, and it doesn’t fall apart when you press it together.
Presentation tip: Arrange everything on a wooden cutting board with toppings in small bowls alongside sliced bagels. Natural materials like wood and linen suit the rustic character of homemade sourdough bagels way better than a polished platter. It looks intentional without requiring any real effort.
Frequently Asked Questions
Can I use sourdough discard instead of active starter?
You can, but the results will be noticeably different. True discard that hasn’t been recently fed won’t provide enough leavening to make the dough rise properly on its own. You’d need to add commercial yeast to compensate. For this recipe as written, you want an active, fed starter at or near its peak.
What if my dough feels too stiff or dry?
Some stiffness is completely normal with this recipe. It’s intentionally lower-hydration than most sourdough recipes. If it genuinely won’t come together after the full 5 to 6 minutes of kneading, add water one teaspoon at a time. But give the kneading time to work before reaching for extra water. Most people find the dough cooperates if they stick with it for the full knead.
How should I store leftover bagels?
Keep cooled bagels in an airtight bag at room temperature for up to two days. For longer storage, slice them before freezing so you can pop them straight into the toaster without thawing. Frozen bagels stay good for about a month.
Can I make the dough the night before?
Yes, and honestly this is the ideal approach. Mix and knead the dough in the evening, then let it bulk ferment overnight at room temperature. By morning it should be doubled and ready to shape. You can also refrigerate the shaped bagels, then pull them out and let them warm up while you bring your water to a boil.
Why did my bagels come out dense?
Dense bagels almost always trace back to one of two issues. Either the dough was under-fermented (your starter wasn’t active enough, or the bulk ferment didn’t finish), or you over-kneaded the dough and tightened the gluten so much that it couldn’t expand. Make sure your starter was truly at peak before mixing, and confirm the dough had genuinely doubled before you start shaping.
Sourdough Discard Bagel Recipe
Ingredients
- 250g warm water
- 150g active sourdough starter (at peak)
- 40g sugar (or honey)
- 500g bread flour
- 10g salt
- 20g honey (for boil bath)
- Toppings of choice: everything bagel seasoning, sesame seeds, asiago cheese
Instructions
- Combine water, starter, and sugar in a bowl. Mix until milky white.
- Add flour and salt. Mix until a shaggy dough forms.
- Knead by hand for 5 to 6 minutes. The dough will feel stiff.
- Cover and rest for 60 minutes.
- Knead for 20 more seconds until smooth.
- Cover and bulk ferment 8 to 12 hours until doubled.
- Divide into 8 pieces of roughly 115g each. Shape into tight dough balls.
- Poke and stretch each ball into a ring with a 2-inch hole. Rest 20 to 60 minutes.
- Boil a pot of water with 20g honey. Boil each bagel 30 seconds per side.
- Dip in toppings while still damp. Bake at 425°F for 20 to 25 minutes.
Video
Notes
- Your starter must be active and at peak. Don’t use discard that has already fallen.
- For cheese-topped bagels, sprinkle cheese under each bagel on the parchment before baking for a crispy bottom.
- Slice before freezing for easy toast-from-frozen storage for up to one month.
Final Thoughts
This sourdough discard bagel recipe takes patience (that bulk ferment is no joke), but the payoff is absolutely worth it. You get chewy, golden bagels with genuine sourdough depth that no store-bought brand can touch. The key takeaways are simple: use your starter at peak, weigh everything, don’t skip the boil, and trust your dough more than your timer.
Once you get the rhythm down, you’ll probably start making these every weekend. They freeze beautifully, they toast like a dream, and they make you feel like the kind of person who has their life together. Even if the rest of your kitchen looks like a flour bomb went off